Happenings March 2026

March 2026
Bug of the Month: Blue Bottle Fly
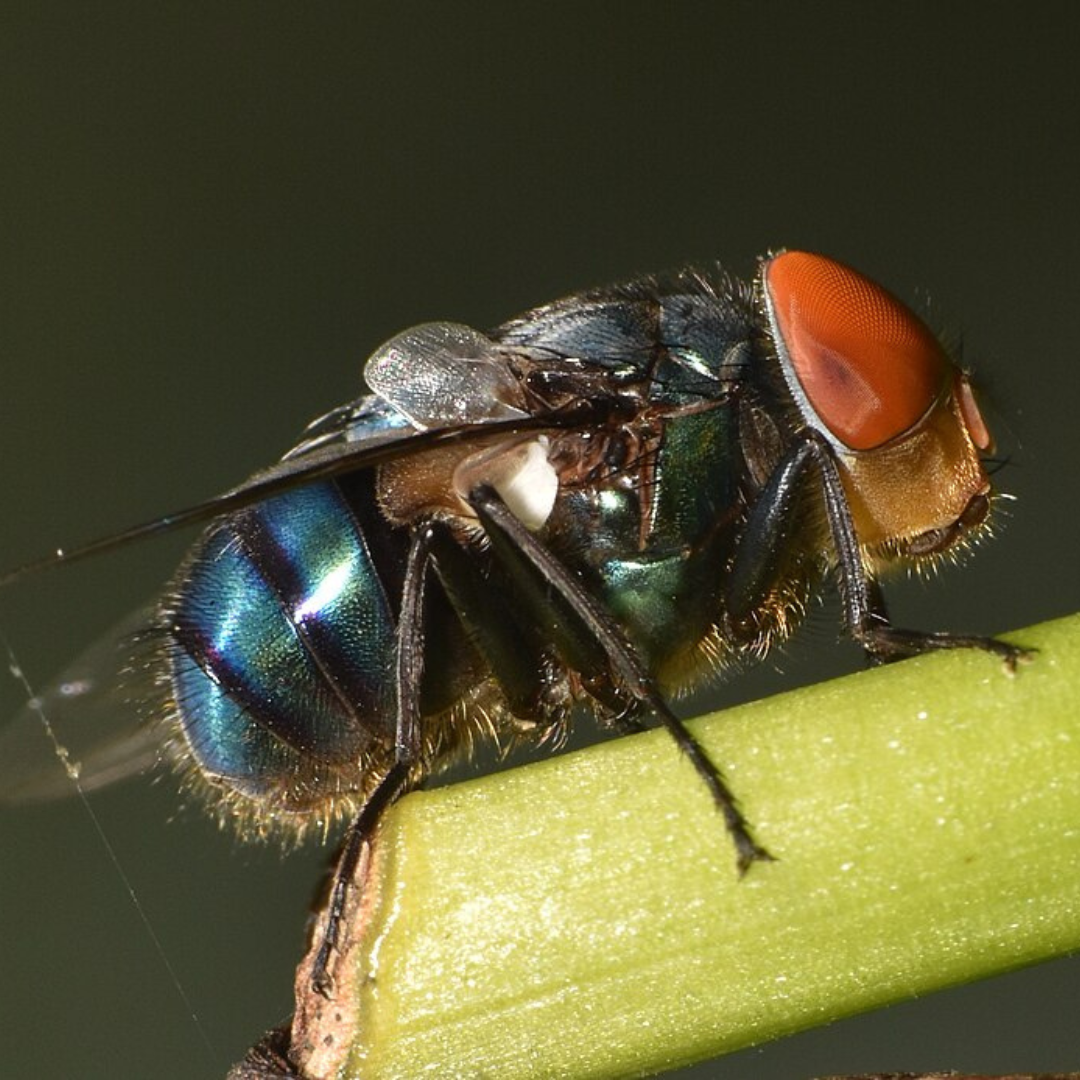
by Janis Butler, Master Gardener Volunteer
For icy late winter, we have a Word of the Month to pair with our Bug of the Month: thermogenesis. ‘Thermo’ for heat and ‘genesis’ for birth or beginning. Late in winter, we do have the beginning of heat, emanating from the first sign of spring to peek out of the snow: the unmistakeable purple spathe of skunk cabbage (Symplocarpus foetidus).
Eons of evolution have resulted in life forms finding niches in which they can survive and thrive, and skunk cabbage, along with its insect companions, is a good example. One of those insects, the blue bottle fly, is an early pollinator of skunk cabbage, drawn to its rotting-flesh color and smell but also to its heat.
Thermogenesis enables the plant to produce heat through cellular respiration as early as February, depending on the weather. The heat can raise the temperature 15-30 degrees above the immediately surrounding air and helps to vaporize skunk cabbage’s pungent, carrion-like odor, allowing the scent to travel further. This is a boon to a myriad of insects who appear seemingly out of nowhere to enjoy the offerings of the skunk cabbage. Blowflies like the blue bottle fly, gnats, beetles and even early-foraging bees are just a few of the species that emerge during brief winter thaws and find skunk cabbage to fill their needs for food and warmth.
As for the blue bottle fly, this familiar fly is found almost worldwide. Slightly larger than the common housefly, with huge red eyes and a fuzzy orange beard, it’s most recognizable by it’s bright, metallic-blue abdomen. It’s the abdomen that provides its Latin name: Calliphora vomitoria. Calliphora comes from Greek, meaning bearer of beauty and refers to the iridescent blue body. Vomitoria, because it regurgitates digestive fluids on its food before eating.
Life Cycle
The blue bottle fly undergoes complete metamorphosis. The egg hatches within 24 hours of being laid. The emerging larvae (maggots) feed heavily and are ready to dig into the soil to pupate in three to four days. Pupation takes a little longer - 11or 12 days - but the entire process from egg to adult is fast, two to three weeks, depending on weather and other conditions. Considering that the mother fly lays 300 to 400 eggs at a time, multiple times in a season, we can understand why bluebottle flies are abundant.
What Blue Bottle Flies Eat
The adult blue bottle fly visits the maroon, hooded skunk cabbage spathe (modified leaf) to seek nectar and lay her eggs, but she will be disappointed in the latter endeavor. The larvae are very particular about their food and must have rotting flesh, dung, or high-protein garbage. They do not eat skunk cabbage. So the mother fly must continue her search for a more appropriate site to lay her eggs, a corpse or a pile of dung, all the while building up her own energy resources with nectar from the flowers that lure her in with the false promise of their flesh-like smells and colors.
The adult blue bottle flies are not fussy eaters but since they, like their larvae, lack chewing mouthparts, they use sponging mouthparts to “drink” their food. This works well for nectar, sap, overripe fruit and liquids from decaying meat, but for more solid foods the adults must first regurgitate digestive enzymes that liquify the food before she can slurp it up. This applies to pollen as well to decaying carrion, both important sources of protein which enable the adult females to produce those prodigious quantities of eggs.
The blue bottle fly is active from late winter until well into fall, pollinating a host of plants that share a common feature: they all have strong smells. These include not only skunk cabbage but also American pawpaw (Asimina triloba), dead horse arum (Helicodiceros muscivorus), goldenrod (Solidago and Euthamia spp.) and some species of the carrot family. The flies often soar in packs in order to detect possible food sources more efficiently. If one fly detects food, it disperses a pheromone that alerts the others to the meal.
Important roles for blue bottle flies
Perhaps you have an unflattering mental image of blue bottle flies and their maggots. Your opinion might change on learning of their importance to humans and our environment.
First, the blue bottle fly’s life cycle holds important clues for forensic scientists, particularly those involved in crime investigation. Because bluebottle flies are among the first to arrive at a carcass and because their life cycle is so predictable, they are important in determining time of death of the carcass. Only eggs present on the body? A recent death. Very fat maggots? Maybe four days. The fact that blue bottle flies rarely fly at night offers another lead to the timing of a corpses’ death.
Another job undertaken by the maggots of blue bottle and other flies is that of flesh cleaning. Since they are drawn to dead and dying tissue, they are increasingly being used in modern medicine to cleanse wounds like diabetic foot ulcers. The maggots are efficient at liquifying the dead tissue and consuming it, leaving healthy tissue intact.
All of that dead-tissue consumption qualifies bottle flies for the title of Chief Decomposers. Their contribution is significant in ridding our world of dead bodies, excrement, and other debris.
And, of course, blue bottle flies are themselves food for critters higher up the food chain. Birds, bats, and beetles eagerly pursue them. So do spiders, who are well-known for placing webs near the entrance to the skunk cabbage spathe specifically for the purpose of capturing flies and other pollinators visiting for a meal.
Photo: Blue Bottle Fly Shiv's fotografiavia via Wikimedia (CC BY-SA 4.0)
Get Expert Advice and Network at CCE Putnam's Aspiring Farmers Day
by Ruby Koch-Fienberg, Ag & Food Systems Coordinator
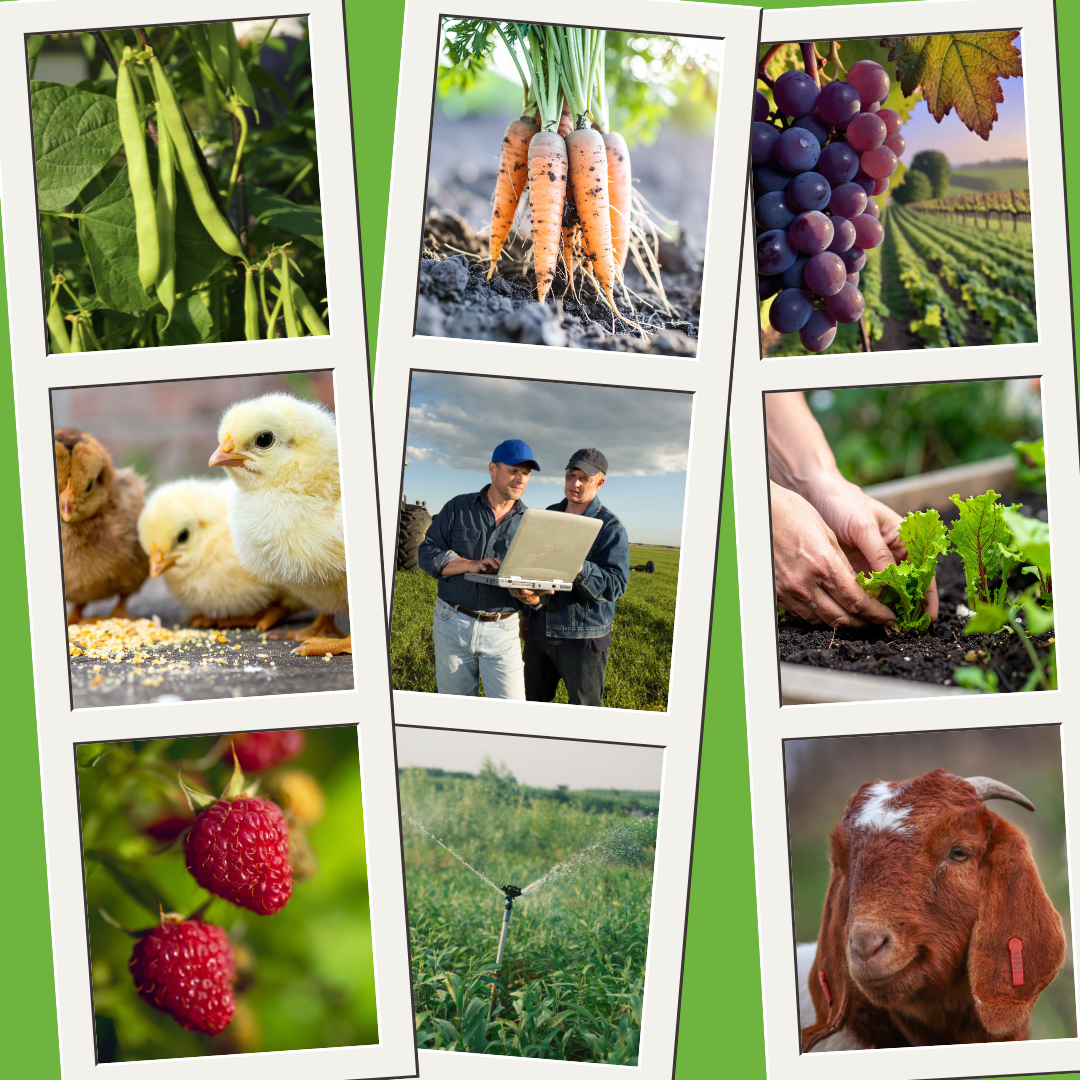
Join us for Aspiring Farmer Day, a hands-on learning event designed to help beginning and prospective farmers take the next step in their agricultural journey. This full-day workshop brings together regional agricultural experts, agency representatives, and experienced local farmers to provide practical knowledge, one-on-one guidance, and peer networking opportunities.
Whether you're considering a farm start-up, exploring diversification options, or expanding an existing operation, this event offers valuable insights across multiple agricultural sectors including vegetables, berries, grapes, poultry, and farm business planning.
Breakout Learning sessions include:
Vegetable Production Basics for New Growers with Teresa Rusinek, ENYCHP
Foundational insights for new vegetable growers including site preparation, soil health fundamentals, crop planning and rotation strategies, season extension basics, and pest management for small-scale operations. Ideal for those starting their first market garden or adding vegetables to an existing farm.
Small Fruit Success: Growing Berries in the Hudson Valley with Heather Kase, ENYCHP
Introduction to small fruit production covering variety selection for the Hudson Valley climate, site assessment and soil preparation, planting systems and spacing, first-year establishment and care, and common pest and disease challenges. Perfect for those considering adding perennial berry crops to their farm plan.
Growing Grapes for Wine and Fresh Market with Jeremy Schuster, ENYCHP
Growing grapes in the Hudson Valley for wine production or fresh market sales. Topics include site selection and vineyard planning, variety recommendations for the region, trellising and training systems, pest and disease management specific to grapes, and harvest timing and quality considerations.
Getting Started with Poultry and Small Livestock with Brandy Keenan, CCE Putnam
Introduction to raising poultry and small ruminants (sheep and goats) on small-scale farms. Topics include breed selection for various purposes (eggs, meat, fiber, dairy), housing and infrastructure requirements, feeding and nutrition basics, flock and herd health management, pasture management and rotational grazing, and navigating local regulations and zoning. Designed for beginners interested in adding livestock diversity to their farm operation.
Turning Farm Dreams into Viable Businesses with Liz Higgins, ENYCHP
Comprehensive session on farm business fundamentals including developing a business plan, understanding farm finances and recordkeeping, pricing strategies and profit margins, marketing and branding basics, and accessing capital and grants. Essential for anyone turning their farm idea into a sustainable business.
Networking sessions include:
Drop-in Q&A and one-on-one consultations with representatives from key agricultural support agencies. Bring your specific questions about funding opportunities, conservation programs, technical assistance, land use planning, and local resources. Are you a local agency and want to table? Email Ruby at Rek247@cornell.edu to see if you’re a good fit.
Bring your own lunch and enjoy an hour of informal conversation and peer learning with experienced farmers from Putnam County and the Hudson Valley region including Joni Lanza of Lanza Farms and Chris Provetto with Kirsten Banga of Pro-Brothers Farm.
Learn more and register at cceputnamcounty.org/events/2026/03/14/aspiring-farmers-day.
Crevice Gardens: Life Between the Cracks
from Kevin Kelly, Master Gardener, PennState Extension

Crevice gardening is a form of rock gardening that allows alpine plants to grow in tight spaces between flat pieces of rock turned on end, often at an angle to mimic natural stratified rock formations.
If you have ever noticed plants growing within the cracks of your sidewalk, you have seen the basic concept of a crevice garden. Crevice gardening is becoming increasingly popular because it offers many benefits over traditional rock gardening, including:
- four-season interest from unique rock formations
- a microclimate that is best for growing alpine plants
- less maintenance than other types of rock gardening, although the initial set-up is more labor-intensive
- a more attractive alternative for a slope or retaining wall
Zdenek Zvolanek of the Czech Republic is considered the pioneer of crevice gardening, coming up with the idea of turning flat pieces of rock on end, often at an angle, to mimic natural stratified rock formations. The surface is warm, and the crevices drain quickly, keeping the plant crown dry. The narrow space between rocks encourages the development of deep roots where they will be cool and moist.
How to Build a Crevice Garden
Location is critical. Crevice gardens are best in full sun and away from large trees whose roots can disrupt the garden. They can be created on a flat area or a slope, but not in an area where water naturally pools. Great drainage is key. The minimum size needed for looks and function is 4 by 6 feet.
Supplies needed:
- Coarse builders' sand (enough to create a 6-inch layer)
- Flat, irregular, locally sourced stone (flagstone is great), various thicknesses
- Some rounded boulders (optional)
- 3/8 inch locally sourced stone (enough for a 4-inch layer)
- Smaller irregular stone, such as poultry grit, as a top dressing
Define the outside edges of the crevice garden. Dig down 6 inches along the edges. You will not need to remove the soil in the middle since you are trying to create a mound or mini mountain. You may want to add soil to create more of a hump, depending on your space. Lay the sand. Spread about 3 inches into the edges and 6 inches over the rest. Start to lay the flagstone on end. Angle it about 10-20 degrees or straight up and down, depending on your preference. Start in the middle and work outward. Remember, you are trying to mimic stratified rock. Scoop the sand out of the way, set the stone, and push the sand around it. Try to use various thicknesses of stone. The crevices should be 1 to 2 inches wide. Leave some pockets for larger plants. Mix in the small boulders (optional). You can use smaller pieces of flagstone as wedges for support. Fill the sand up to 4 inches from the top of the stones. You will likely move the stones around a lot until you like the look. This can take all afternoon just for a small crevice garden.
Start to lay about 2 inches of the 3/8-inch stone over the sand. Then, it's the time to plant. A list of good beginner plants appears below. Buy the plants in small containers or divide them. Try to bare root the plants by lifting them out of the pot, shaking off as much of the soil as possible, then rinsing away the rest of the soil. Move your stone/sand mix, but do not dig into the soil below. Set the roots into the hole and carefully backfill. Then push more 3/8-inch stone around the plant up to the crown. Once all the plants are in, water well, and water again in two hours. You may need to water 1 to 2 times a week over the next few months until the roots establish.
Maintenance is easy. Keep leaves off the garden. When cutting back the plants, remove the pruned material. You do not want organic material to decay on top of the stones and create soil.
Recommended beginner plants with USDA Hardiness Zones:
- Sempervivum spp.; Zones 4-8
- Thymus pseudolanuginosus (wooly thyme); Zones 4–8
- Armeria maritima (sea thrift); Zones 4–8
- Aubrieta deltoidea (rockcress); Zones 5–7
- Arabis blepharophylla (coastal rockcress); Zones 5–8
- Saponaria ocymoides (rock soapwort); Zone 2–9
- Delosperma spp. (ice plant); Zones 6–10
- Saxifraga spp. (rockfoil); Zones 5–7
- Lewisia spp.; Zones 3–8
Photos by Kevin Kelly, Penn State Extension Master Gardener
Spring Clean Your Life – Less Is More
from Rebecca Mills, Utah State University Extension

Spring is a time of re-birth, baby animals, green grass, flowers and budding trees. It is a season of renewal. Historically, spring was the time homemakers cleaned the winter coal soot off the wall coverings and fixtures of their homes. A deep clean on the inside of the home, no doubt, reflected the freshness of the season outside. Though times have changed, there is still the desire for cleaning and renewal in our homes. One place to begin is to remove the clutter.
Clutter is all around us; our lives are cluttered with words, images, data, sounds and stuff. Big stuff, little stuff, stuff we don’t even remember we have because it is buried under other stuff or stuffed into boxes of stuff. Clutter is our generation’s “coal soot.” We bring it into our lives to fill a need, be it emotional or physical. But for some reason, we let it stay long after the need has been filled. Here are three tips to clear the clutter and spring clean your life.
1. Create a baseline. Just like in budgeting, weight loss or any habit change, it’s difficult to make changes unless you have a good idea of what’s happening to begin with. For example, assess your clutter. Is it mostly clothes, toys, papers, tools or books? Start by bringing all of the same types of items together in one place. Start small, say, with shirts and get them all in one pile.
2. Assess the value. Go through one item at a time and evaluate whether or not it is still useful and brings you joy.
3. Keep, trash, donate or sell. Your number one goal is to keep only the items that bring you the most joy. You can send the rest away, and it’s okay! There will be many items that have good use left in them. But if you’re not using them, do what you can to get the items into the hands of someone who will.
Less truly is more. Consider the tiny house movement. When we own less, we have less to clean, less to trip over and the potential to bring harmony into a home. Can you imagine a weekend without nagging the kids to clean their bedrooms? Fewer items to put away paired with habits of giving every item a “home” creates an opportunity for neatness.
Now, a few words of caution:
1. Beware of the temptation to buy more storage bins. While the storage industry has made leaps and bounds in developing items that are fashionable and attractive, that doesn’t necessarily mean you need them. After you’ve decreased the number of belongings, you might just realize you don’t need so many bins and pockets and cubbies to hide things in so your home has the appearance of tidiness. Tidiness is a natural result of owning less.
2. Evaluate your buying habits and motivations. As you are letting go of things you no longer need, think about why you purchased or acquired the items to begin with. If there are habits you need to change, apply those habits to future purchases and learn from the experience.
3. Be kind to yourself. You’ll no doubt have some misgivings about the items you’re letting go. The money spent on those items is gone, and guilt over making a purchase you didn’t necessarily use responsibly or no longer need isn’t worth it.
The feeling of clearing things out is a lifted burden and is invigorating and refreshing…kind of like spring!
Source: Kondo, M. (2014). The life-changing magic of tidying up: The Japanese art of decluttering and organizing. New York: Ten Speed Press.
4-H News: Fun with Felting!
by Brandy Keenan, 4-H Educator
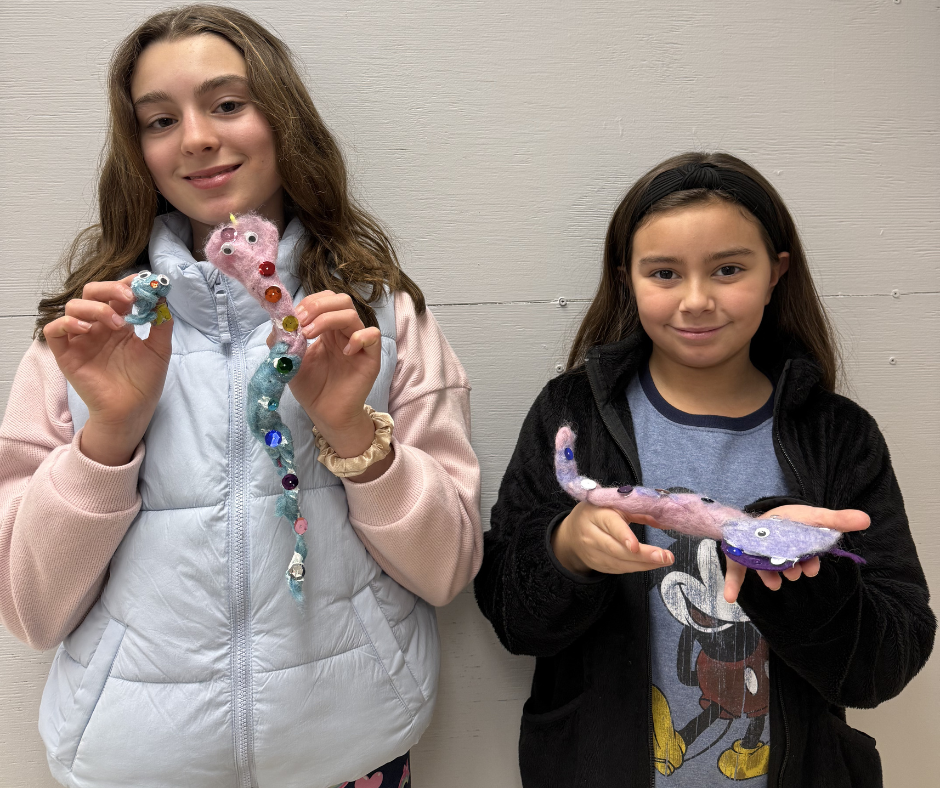
This month the NatureCraft club made snakes out of wool through a process called “wet felting." Wet felting is an ancient technique that transforms loose wool fibers into dense fabric using hot water, soap, and agitation. The process involves layering wool roving, wetting it with warm or hot soapy water to open fiber scales, and applying friction through rubbing and rolling to lock the fibers together.
Originating among nomadic Central Asian peoples, felting was historically used to produce garments, footwear, and shelter coverings due to its insulating and waterproof properties. The Mongolians also used large sheets of felt to cover their yurts, which are temporary homes that served their nomadic lifestyle and the harsh environment of the steppe. To make these large sheets, they used camels or horses to drag rolls of wet fleece across the steppe. The rough ground and movement created the friction needed to mat the fibers. Sheep will be ready for their spring shearing in the next couple of months which makes this a great craft to do with your family!
How To:
All you need for this craft is roving or unseen wool (dyed), a pipe cleaner, a gallon resealable bag, 1 cup of warm water, 1/2 tsp dish soap, a towel, and optional things to decorate your snake with like felt pieces, googly eyes or sequins.
Take the pipe cleaner and bend one end over to create a loop the size of your snakes head and twist to secure the shape. Take three thin strips of the wool and wrap around the loop. Your pipe cleaner should look like a lollipop.
Now wrap the rest of your pipe cleaner with strips of wool so you don’t see any of the pipe cleaner. Next, put your “snake” at the bottom of the resealable bag. Mix 1/2 tsp of dish soap into the cup of warm water. Now add about 1/4 cup of water to the bag. The snake should be wet but not swimming in water.
Close the bag while pressing out all the air. Now massage and squish your snake until all the wool is soaked through, about 5 minutes.
Take you snake out of the bag and place on a dry towel. Now roll your snake back and forth on the towel like you were rolling clay for about 5 minutes.
Set your snake aside to dry. Decorate when it is dry.
March is National Nutrition Month®: Join SNAP-Ed Nutritionists Live on Facebook
from Josephine Quiocho, Nutrition Educator
Tune in to power up with breakfast! Join SNAP-Ed Nutritionists live on Facebook as they celebrate National Nutrition Month® with some of their favorite breakfast recipes.
Tuesday, March 10: Get tips on whole grains while making a Fantastic French Toast recipe.
Tuesday, March 17: Celebrate St. Patrick’s day with some grab-and-go recipes, including the Shamrock Power Smoothie.
Tuesday, March 24: Power-up with a protein and veggie packed Healthy Egg Burrito recipe.
Find the Lives and more from SNAP-Ed NY on Facebook: @SNAPEdNewYork
Celebrate Peanut and Noodle Month with this Tasty Recipe

from Josephine Quiocho, Nutrition Educator
March is both Peanut and Noodle Month. This recipe uses both!
Noodles with Peanut Butter Sauce
Peanut butter sauce, also called satay sauce, is commonly served in China, Indonesia, Malaysia, Thailand and Vietnam to add flavor to grilled meats and noodles.
Ingredients
- 3 ounces spaghetti noodles, whole grain
- 11 ounces chicken breast, boneless, skinless, 1/2” diced
- 3 cups broccoli, frozen, cut
- 3 tablespoons peanut butter, smooth
- 3 tablespoons water
- 3 tablespoons soy sauce, low-sodium
- 1 tablespoon cider vinegar
- 1 tablespoon sugar, granulated
- 1/8 teaspoon ginger, fresh, grated
- 1 clove garlic, fresh, minced (1 clove is about 1/2 teaspoon minced)
- 1/8 teaspoon red pepper flakes
- 1 teaspoon cornstarch
- 2 tablespoons onion, green, with tops, chopped (optional)
- 2 tablespoons cilantro, fresh, chopped (optional)
- 6 slices lime wedge, fresh (optional)
Directions
1. Heat water to a rolling boil.
2. Break spaghetti noodles in half. Slowly add noodles to boiling water.Stir constantly until water returns to a boil. Cook about 8 minutes or until al dente. Stir occasionally. Do not overcook. Drain well.
3. Coat a medium skillet with nonstick cooking spray. Heat the skillet on medium–high. Brown all sides of diced chicken on medium–high heat for 8 to 10 minutes.
4. Add broccoli to the skillet, and cook for 10 minutes or until internal temperature of diced chicken reaches 165 degrees and broccoli is tender, but not mushy.
5. Prepare sauce: In a small microwavable bowl, combine peanut butter, 2 Tbsp warm water, soy sauce, cider vinegar, sugar, ginger, garlic, and red pepper flakes.
6. Microwave sauce for 30 seconds; remove from the microwave, whisk sauce and microwave for 30 more seconds, whisk again. (Note: sauce will look stringy.)
7. In a small bowl, whisk remaining 1 Tbsp warm water with cornstarch to make a slurry (thin paste). Be sure cornstarch is fully dissolved in the water before adding the slurry to the sauce.
8. Slowly whisk slurry into the peanut butter sauce until fully combined. Microwave 30 seconds or until thick. Whisk until sauce is a smooth–thick consistency.
9. In a large bowl, toss peanut sauce, chicken, broccoli, and noodles.
10. Garnish each serving with 1 tsp green onions, 1 tsp cilantro, and one lime wedge (optional).
Find the recipe at SNAP-Ed NY: https://snapedny.org/recipes/noodles-with-peanut-butter-sauce/
![]()

Last updated March 2, 2026


Chris Ruthven and the Putnam County Parks Division
Every year, CCEPC works with agencies, organizations and departments countywide. In this new series, we'll "Take a Moment" to recognize those with whom we collaborate, starting with Putnam County Parks Division Director Chris Ruthven and the parks' crew.
The Putnam County Fair and 4-H Showcase takes place every summer at Veterans Memorial Park in Kent. Months of planning and weeks of preparation go into making the fair a success. And it wouldn't be possible without the hard work and dedication of Chris and his crew. From helping plan the logistics and reaching out and assisting vendors to making the park grounds look pristine and putting everything in its place, the county Parks Division is the backbone of the event.
In addition, Chris and his crew are always there to make sure events we hold at county parks go off without a hitch – clearing trails at the Tilly Foster Forest and preparing the grounds at the farm.
We are so grateful to have Chris and the Parks Division crew work with us on so many projects.
March is ...

Developmental Disabilities Awareness Month
Developmental Disabilities Awareness Month, officially recognized in 1987 by U.S. President Ronald Reagan, is a nationwide observance highlighting the experiences, rights and contributions of people with developmental disabilities. The month emphasizes public education, advocacy and fostering inclusive communities as well as exploring the work we still need to do to remove barriers.
Resource: National Association of Councils on Developmental Disabilities

American Red Cross Month
Red Cross Month began during World War II, when U.S. President Franklin D. Roosevelt called on individuals to address growing humanitarian needs. What started as a national call to action has become a community tradition — reaffirming the power of compassion and the impact we can make together.Your support can make a lifesaving difference— whether it’s giving blood, making a financial donation, volunteering or learning lifesaving skills.
Resource: American Red Cross

Adopt a Rescued Guinea Pig Month
Adopt a Rescued Guinea Pig Month was established in 2002 by the American Society for the Prevention of Cruelty to Animals (ASPCA) to highlight the need for homes for abandoned or surrendered guinea pigs and to promote adoption over purchasing from pet stores. The month-long observance aims to educate the public about guinea pig care, encourage responsible adoption, and reduce the commercial breeding of these animals.
Resource: American Society for the Prevention of Cruelty to Animals

National Crochet Month
Founded in 2000 by the Crochet Guild of America, National Crochet Month honors the art of crochet, bringing attention to the joy of turning simple yarn into unique creations. There are plenty of ways to celebrate National Crochet Month—Host a crochet party, share your creations on social media or teach someone to crochet. If you’d like to learn how to crochet, there are plenty of tutorials online.
Resource: Crochet Guild of America

Berries and Cherries Month
Berries and Cherries Month celebrates the arrival of spring and the delicious and nutritious qualities of strawberries, blueberries, raspberries and cherries. This month-long observance encourages people to enjoy these fruits in various forms, such as fresh, in smoothies, baked into desserts or made into jams and jellies. The celebration has roots in the United States, particularly in Michigan, where Peter Dougherty planted cherry trees in 1852, leading to a thriving cherry industry. Over time, regional agricultural fairs and festivals promoting berries and cherries evolved into the broader recognition of March as Berries and Cherries Month.
Resource: Seasonal Food Guide
Rare Chestnut Bee Discovered at SUNY ESF Orchard

A rare bee species native to New York state was discovered in Syracuse at a SUNY College of Environmental Science and Forestry (ESF) research station in July 2025.
ESF pollinator ecologist Molly Jacobson collected two specimens of Andrena rehni, also known as the chestnut mining bee, from native American chestnut trees—marking the first confirmed sighting of the species in Central New York and only the second known population in the state.
The bee, a solitary ground-nesting species, is a pollen specialist that relies exclusively on chestnut and chinquapin flowers. Its survival is closely tied to the presence of these trees, which were decimated by chestnut blight in the early 1900s. Andrena rehni was last recorded in southern New York in 1904, prompting the New York Natural Heritage Program to list the bee as ‘possibly extirpated’ in their 2022 Empire State Native Pollinator Survey assessment.
It was not until 2023 that the bee was rediscovered in New York by Jacobson, who located a population at Lasdon Park & Arboretum in Westchester County. The identification was confirmed by ESF alumnus Sam Droege of the United States Geological Survey (USGS) Native Bee Inventory & Monitoring Lab. That finding was published in Northeastern Naturalist with co-author Hannah Pilkey, production manager for ESF’s chestnut research team and ESF alumna.
This new find in Syracuse, however, represents the first time the bee has ever been found north of the Hudson Valley within New York.
“This is a significant record,” said Jacobson. “It expands the known range of the bee in New York and shows promise for its persistence in managed orchards, even in urban settings like Syracuse.”
The research site in Syracuse includes a variety of chestnut trees—from wild American and chinquapin to hybrids and Chinese varieties—offering researchers a unique opportunity to study the bee’s preferences and behavior.
“We still know very little about the ecology and biology of this bee,” Jacobson said. “No nests have ever been found, and future research could focus on whether it will use non-native chestnut species.”
Said Dr. Andrew Newhouse, director of ESF’s American chestnut restoration project, “The rediscovery of this bee in our orchard illustrates another beneficial impact restoring this iconic tree to the northeastern landscape can have on the environment.”
Andrena rehni is one of many animal species that depend on American chestnuts for survival. Its rediscovery underscores the importance of ESF’s work to restore this keystone tree.
“The discovery of the Chestnut bee showcases the importance of the work that ESF is doing to restore this keystone tree species to the landscape,” said ESF President Joanie Mahoney. “Congratulation to the ESF Chestnut team on the success of its groundbreaking research.”
The SUNY College of Environmental Science and Forestry is dedicated to the study of the environment, developing renewable technologies, and building a sustainable and resilient future through design, policy, and management of the environment and natural resources. Members of the College community share a passion for protecting the health of the planet and a commitment to the rigorous application of science to improve the way humans interact with the world. ESF students live, study and do research on the main campus in Syracuse and on 25,000 acres of field stations in a variety of ecosystems across the state.
Online Exams for Nuisance Wildlife Control Operators
The New York State Department of Environmental Conservation (DEC) announced a new online exam for people seeking to become licensed Nuisance Wildlife Control Operators (NWCOs). To provide enhanced access, DEC is offering these examinations online and free of charge.
“As part of our ongoing efforts to enhance the customer experience, DEC is proud to offer these free examinations online,” DEC’s Deputy Commissioner for Natural Resources Katharine Petronis said. “This process makes it easier for individuals to meet examination requirements, apply for a license, and take part in helping others safely respond in situations where wildlife is damaging property or has become a nuisance.”
A NWCO is a person at least 18 years of age who is authorized to take/trap, transport, and release wildlife whenever an animal becomes a nuisance, destroys property, or threatens public safety. Licensed individuals can conduct these activities for commercial purposes or as an employee of a municipality.
Applicants are not required to be a resident of New York State to receive a NWCO license.
The 2 hour exam can be completed any time between 7 a.m. and 11 p.m.
All exams will be online. Exam and registration instructions and a NWCO training manual can be found on DEC’s “Nuisance Wildlife Control Operator” webpage.
To register, visit the “NYS Department of Environmental Conservation Special Licenses Exam Registration - Nuisance Wildlife Control Operator Exam” webpage. Applicants will receive an email acknowledging registration with a one-time link to access the exam on the specified exam date. Upon successful completion of the exam, applicants will receive information on applying for the license, including an application form. Please do not send applications or fees prior to passing the examination.
For questions or assistance please contact:
DEC Special Licenses Unit, 625 Broadway, Albany, NY 12233-4752
Email SpecialLicenses@dec.ny.gov or call 518-402-8985.
Extension Out Loud Podcast: Sowing the Seed of Success
from Paul Treadwell, Distance Learning Specialist, Cornell Cooperative Extension
The past few years have seen a noticeable increase in the number of people choosing to grow food in their backyards. Eighteen million new gardeners have joined the ranks of seasoned veterans planting and harvesting homegrown food. Seed catalogs, websites, and local home and garden stores now offer a broad selection of possible choices for the home gardener.
Knowing which seeds to select depends on a few variables such as first and last frost dates and growing zone. In a recent episode of Cornell Cooperative Extension’s ‘Extension Out Loud’ podcast, Stephen Stresow of Cornell’s Garden-Based Learning program discussed some key factors to consider when selecting seeds.
According to Stresow: “It’s all about right plant, right place.” His advice when evaluating seeds for your garden: “My personal advice to gardeners is, I like starting off with stuff that’s easy to grow.”
Choosing the right seed for the right place can feel overwhelming for new gardeners. Hybrid, organic and open-pollinated are just some of the options for individual varieties. Sorting through these possibilities is made easier by Cornell’s Vegetable Varieties for Gardeners website. This site crowdsources ratings based on gardeners’ experiences with different varieties. Used in combination with the Selected List of Varieties for Gardeners, which includes data from campus research and test plots, choosing the right seed for the right place becomes much easier.
Stresow also discussed gardening resources that are available through Cornell Cooperative Extension offices across New York State. “One of the great parts of gardening and seed saving is not just having these great crops-- these great genetics,” he said. “It's that community that you build through saving seeds, sharing information, sharing stories, and the historical value of some of these crops and varieties that we might not know about.“
Listen to the Extension Out Loud podcast on Apple, Google and Spotify.


CLICK HERE and become a part of our efforts
to build our new home at Tilly Foster Farm!
Tidbits

Owl Prowling at Tilly Foster Farm
from Jennifer Lerner, Senior Resource Educator
Walking in the snow on a winter night is magical, even more so when you are listening for owls. Thirty people, adults and youth, walked through the dark at Tilly Foster Farm’s Restore and Regenerate Forest on a February night, accompanied by Tait Johansson from Bedford Audubon, who made eerily accurate calls to summon up the owls. The group stood in silence and listened. Young owl prowlers joined us and got to use cool headlamps to peer into the night.
“This time of year, owls are looking for mates and nests sites, and if the habitat is right, and they’re in the mood, you may be lucky to hear them calling each other,” says CCE’s Jen Lerner. On this particular February night, the group had no luck on the outdoor prowl, though barred owls had been reported in the forest.
Not all was lost! We were also visited by Animal Embassy's Chris Evers and his owl “Taiga.” Chris opened up the groups’ eyes to owl behavior, physiology, and range. Taiga flapped her amazing wings. With a wingspan over 5’ feet we felt the rush of air in every corner of the room. Chris shared some things you could do to support owls in your landscape. Consider planting native plants to draw in creatures that use them for habitat. Chipmunks, and red and gray squirrels attracted to larvae and seeds make good food for our native owls!
You can also put up nest boxes and platforms. Which is precisely what Soldiers2Scientists’ Mike Cohn is proposing to do with help from Dwyer Vet2Vet. Nest boxes will be monitored with a small camera to check on usage, and hopefully rearing success. Who-who-who will use our nest boxes? We’ll let you know.
CCE Scholarship Opportunities
CCE Putnam County is offering several scholarship opportunities for graduating seniors who live in Putnam County. Applications for all scholarships are due April 30 and can be submitted online after March 1.
The Master Gardener Volunteers Scholarship is sponsored by the Master Gardener Volunteer program of CCEPC and will award one $1,000 scholarship to an individual pursuing a degree in the field of Plant Science, Horticulture, Floriculture, Architectural Landscape Design, Forestry, Botany or environmentally related program.
The Hebe Gordon 4-H Scholarship is administered by CCEPC. One scholarship of $500 will be awarded to a young person who has been actively engaged in the 4-H Horse or Animal Science Club Program for at least three years, and who will be pursuing further education upon high school graduation.
The William C. Nichols 4-H Memorial Scholarship is sponsored by the Family of William C. Nichols and administered by CCEPC. There is one $1,000 scholarship awarded to an individual who has been part of 4-H for 3 years and demonstrates leadership and community engagement through 4-H, school and other organization activities.
All awardees will receive their scholarship money after completion of the first semester of college and after submitting a copy of the semester’s transcript to CCEPC within one month of completion of first semester.
Learn more about our scholarships on our website. Apply HERE.
At a Glance ...

Food Preservation Lunch & Learn Series
Thursday, March 19
12 to 1 p.m.
Zoom
CCE Putnam Ag and Food Systems Coordinator Ruby Koch-Fienberg will be teaching a Thursday Food Preservation Lunch and Learn class via Zoom. The topic will be "Planning Your Garden for the Jar."
The price is $5 for each class.
Register HERE.

Putnam County Tree & Shrub Seedling Sale
Sales Open Online
Cornell Cooperative Extension and Soil and Water Conservation have teamed up to offer a wonderful selection of trees and shrubs. The seedling sale has a long-standing tradition of planting trees and shrubs that create habitat and protect water quality. Our selection of plants includes native trees, shrubs, and perennials that support birds and pollinators.
We will once again have a selection of cost-effective native plant plugs. These small perennial starts are a thrifty way to get a head start on creating your backyard habitat. From shade to sun, we have you covered. Be sure to shop before the deadline of March 27. Plants will be sold online only, on a first-come first-reserved basis, and there are limited quantities of seedlings.
For more information, visit HERE.

Spring Emergence – Living with American Black Bears
Saturday, March 7
10 a.m. to 12 p.m.
Clearpool Model Forest
Green Chimneys Clearpool Campus
33 Clearpool Road, Carmel
Spring emergence of curious bears can lead to more sightings. Learn about bears & tips to coexist responsibly and avoid unwanted encounters.
Join us to learn the bare necessities of living responsibly with black bears roaming the neighborhood. Hear from a NYS Department of Environmental Conservation Wildlife Biologist about black bears lifestyle and habitat, while learning safety tips and best practices to coexist with bears while avoiding unwanted encounters at home or on the trail. Participants will have access to educational handouts provided by CCE, NYSDEC and BearWise! Stick around after the presentation for an optional short hike to look for wildlife enhancements and bear activity with CCE!
Presented by: NYSDEC Wildlife Staff, CCE Columbia – Greene, CCE Putnam
There is a $25 registration fee.
Register HERE.

Aspiring Farmer Day
Saturday, March 14
9 a.m. to 2:15 p.m.
Location to be announced
Join us for Aspiring Farmer Day, a hands-on learning event designed to help beginning and prospective farmers take the next step in their agricultural journey. Hosted by Cornell Cooperative Extension Putnam County and the ENYCHP team, this day offers a chance to learn directly from regional experts and connect with other new farmers.
Perfect for anyone considering a farm start-up or expanding an existing operation.
There is a $30 registration fee.
Register HERE.

Garden Planning: Planting a Pollinator Garden
Wednesday, March 25
6:30 PM - 7:30 PM
Zoom
This virtual presentation provides participants with an overview of planting a pollinator garden. You will learn the whys and hows of planting for pollinators.
$5 suggested donation
Register HERE.

The Birds Are Back in Town
Saturday, March 28
8 a.m. to noon
Tilly Foster Farm
100 Route 312, Brewster
The birds are back in town! Join us as we look and listen for migrating birds as they pass through our on the way to their summer nesting quarters. Tilly Foster Farm’s fields and forests offer diverse viewing opportunities for observing these awesome creatures. Volunteers from Bedford Audubon and staff from Soldiers2Scientists will be on hand to help you navigate the world of birding.
There is a tiered registration: $0, $10, $20
Register HERE.

Health Department Announces Free Rabies Vaccination Clinic in March
Attention Putnam Residents! Bring your dogs, cats, and ferrets to a FREE rabies vaccination clinic Saturday, March 21 from 10 a.m. to 12 p.m. Sponsored by the Putnam County Department of Health, the clinic is being held at Putnam County Veterans Memorial Park (Upper Park), 201 Gipsy Trail Road, Carmel, and is open to all Putnam County residents.
Please bring a photo ID as proof of Putnam County residency, as well as proof of prior rabies vaccination. Tags are not acceptable. If you do not have proof of prior rabies vaccination, your pet will receive a one-year rabies vaccine. Pets must be at least 12 weeks old. All dogs must be leashed and controlled. Any dog that may become aggressive must be muzzled. Cats and ferrets must be in carriers, top-loading carriers preferred, no harnesses. All animals must be supervised by an adult. For the comfort and safety of the animals, please limit the number of people accompanying your pet.
For more information and directions, call 845-808-1390, ext. 43160.
Health Department Travel Clinics Start March 13
As people tire of frigid temperatures and darker days, many cope by planning vacations for the upcoming spring and summer. The Putnam County Department of Health is kicking off its 2026 monthly travel clinics Friday, March 13, from 8:30 to 10:30 a.m. Health department nurses suggest getting any necessary vaccines at least two months before travel, and already some Putnam travelers have scheduled their appointments. Clinics will continue on the second Friday of each month. Registration is required and appointments can be made by calling the immunization program directly at 845-808-1332.
“Whether families are traveling across the globe or visiting a new destination for the first time, preparation is the key to a safe and healthy trip,” said Putnam County Executive Kevin Byrne. “These travel clinics are another example of how we’re delivering practical, valuable services that protect our residents and give them peace of mind before they leave home.”
“Overseas travel can present health challenges that Putnam residents don’t normally face at home,” said Health Director Rian Rodriguez, MPH. “It is important to begin gathering information early in your planning stage. Some countries do require specific vaccines before entering, but others do not. It is also important to remember that healthy travel is much more than just getting required shots. Our nurses not only provide vaccines, but also guidance about other health risks you may encounter, even if they are not new.”
“We have a variety of travel vaccines in stock,” said Rebeca Garcia, RN, BSN, the immunization coordinator at the health department. “The most common immunizations we give for travel are typhoid, hepatitis A, rabies and yellow fever.” The health department is a registered yellow fever vaccination center and provides certificates of vaccination for this potentially deadly mosquito-borne illness.
Insect bite and sun protection, along with food and water safety are some of the health challenges that travelers may face abroad and maybe to a greater degree than usual. These concerns can be met with many of the same tried-and-true practices from home.
One common sense, yet far-reaching, travel tip is to pack the most effective insect repellant, typically with 25-30 percent DEET according to the independent, nonprofit Consumer Reports magazine. According to the WHO, illnesses spread by mosquitoes account for about 17 percent of all infectious diseases globally. These include not only yellow fever, but also chikungunga, malaria, dengue, and Zika.
Sun protection is also important, just as it is at home. Sunburns can occur even on overcast days and vacationers may choose to avoid noontime sun, which also helps avoid the risk of heat-related illnesses. Sunscreen, hats, long sleeve shirts and pants can provide protection from the sun. Staying hydrated is key and bottled water from a reputable source is recommended.
When it comes to food considerations while away, helpful tips come from the department’s food sanitarians that inspect restaurants and provide food safety education year-round. Mitch Lee, a senior public health sanitarian, said, “Depending on the sanitary conditions in your destination, travelers may want to take the extra precautions. Eat only hot foods that are steaming and cold foods that are chilled. Avoid raw foods, fresh salads, cut fruit, street food, local game meat, and unpasteurized dairy. Dry or factory-sealed packaged foods are generally safe.”
With beverages, Mr. Lee advised avoiding tap water, ice, fountain drinks and freshly squeezed juices prepared by others. “Bottled or canned drinks from sealed containers and reputable sources or hot drinks, served steaming are the best choices,” he said. “It is also a good idea to brush your teeth with bottled or boiled water, and as always wash your hands before eating and preparing food. Use a sanitizer if soap and water are not available. Contaminated water, and food, can cause illness and ruin a pleasant trip.”
Circling back to infectious illnesses a traveler may encounter abroad….Every Thursday, the New York State Department of Health publishes its comprehensive 20-plus-page “Global Health Update” on select ongoing and emerging infectious disease outbreaks both in the U.S. and globally. Some of the diseases covered in this report are familiar like yellow fever, measles, polio and influenza; others have the stranger names like chikungunya, nipah and new world screwworm.
These summaries help inform public health nurses and other professionals, as well as interested members of the public. Most of these diseases also have fact sheets available from the World Health Organization website.
The mission of the Putnam County Department of Health is to improve and protect the health of the Putnam County community. The department, nationally accredited by the Public Health Accreditation Board (PHAB) through 2029, serves a community composed of nearly 100,000 residents. Core services are provided through a lens of equity, and include community health assessment, disease surveillance and control, emergency preparedness, environmental health protection, family health promotion and health education.
For more information, visit the Health Department website at www.putnamcountyny.gov.